Mapping the Tullahoma Campaign
As the presentations from this year’s Emerging Civil War Symposium air on C-Span3 I will publish the map I made to accompany each talk. Because our theme this year was “Forgotten Battles” I knew that some of the topics might not have quality maps for support. Furthermore, I assumed that many attendees and our blog audience had not visited most of the sites, thus I created modern tour guides rather than historical maps. Troop movements are still overlaid onto the maps with varied degrees of detail. Up first is the Tullahoma Campaign.
The full presentation by Chris Kolakowski can be seen on the C-Span website.
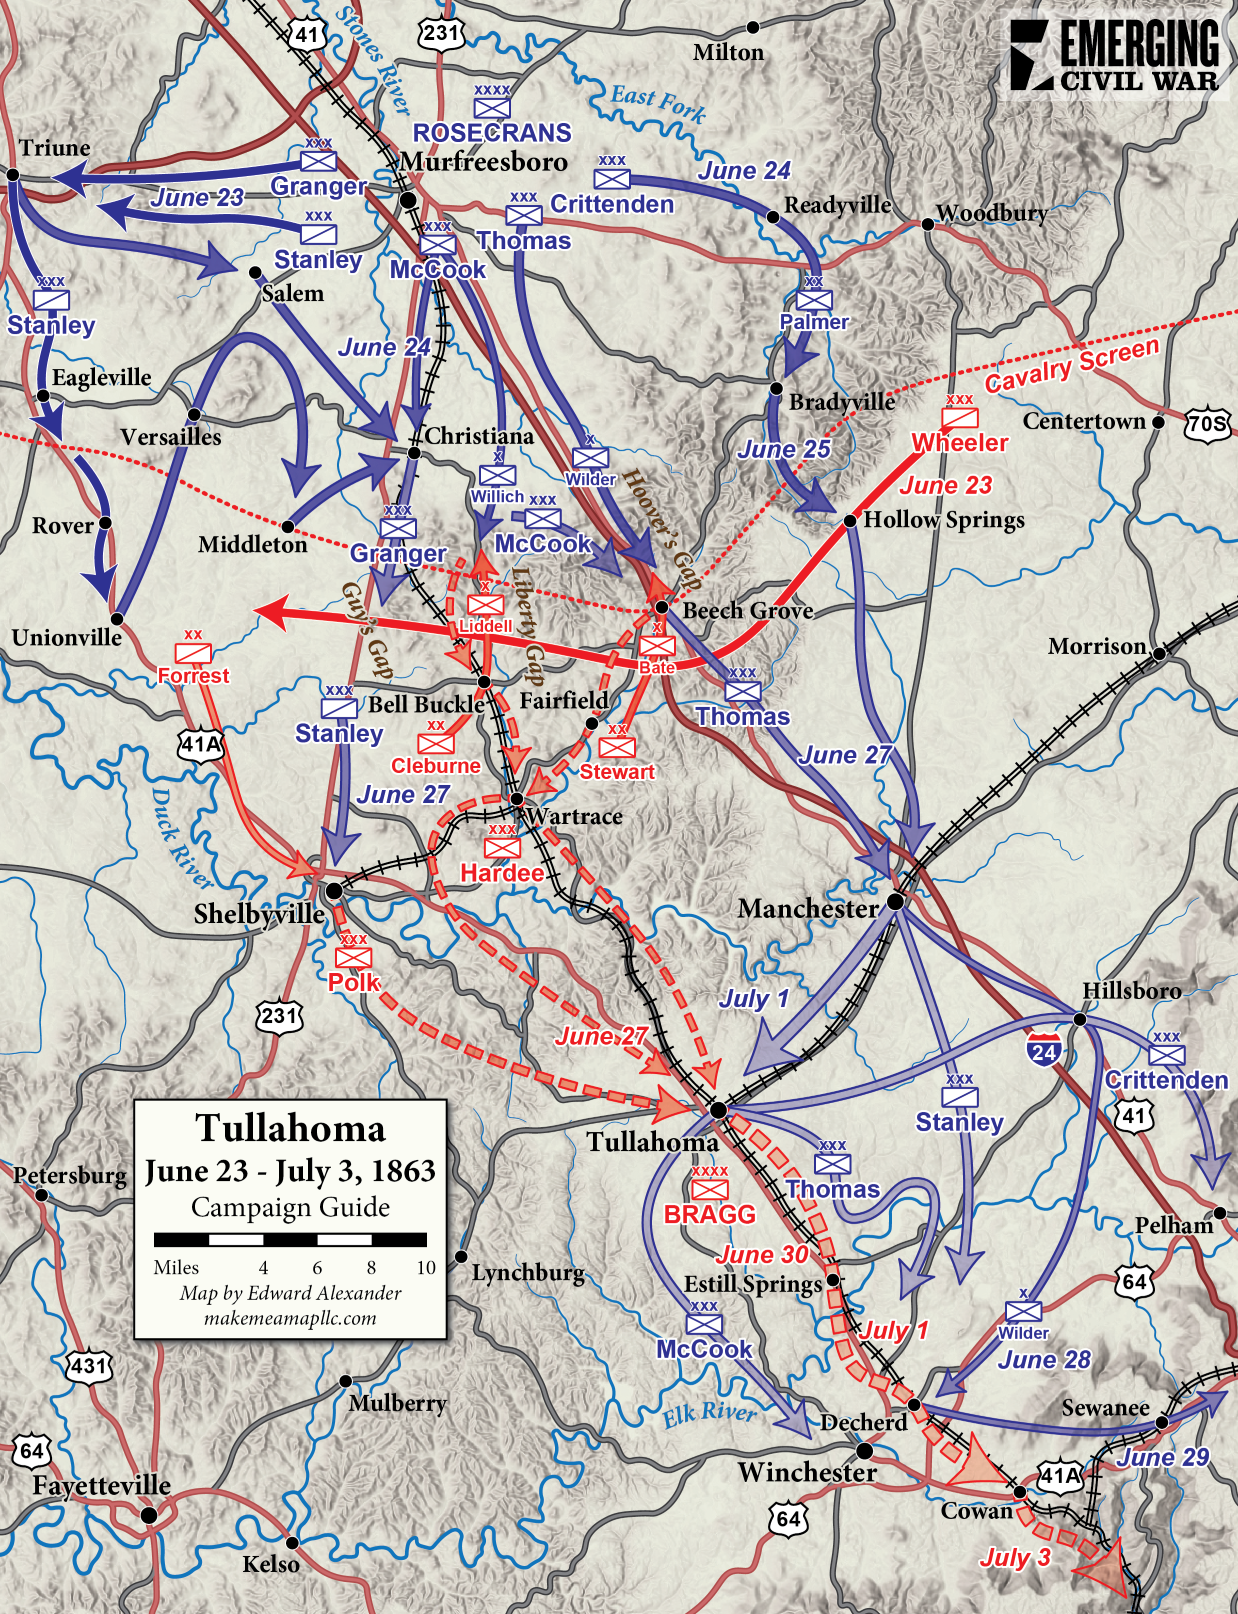
This was one of the more challenging maps of the batch. It definitely had the largest scope to include. In hindsight I might have zoomed in to show more detail around the mountain gaps, but I wanted to show the full campaign front to highlight how Rosecrans was able to deceive Bragg. The baiting of the Confederate cavalry into concentrating around Shelbyville had a major impact on the Union army’s ability to easily slide around the Confederate right.
A map of the campaign really ought to include Chattanooga (and probably Nashville) to demonstrate the strategic impact of the Union maneuver but I knew I would not have room to show any sort of troop details with a scale that zoomed out.
Most of the other Symposium maps that I post will contain more details about how to visit these sites. This one for Tullahoma only has a modern highway network background. That is not to say that there are no interpretive stops. Middle Tennessee State University performed a study and placed wayside exhibits throughout the region. Unfortunately, they have not maintained the webpage that was meant to accompany this possible driving tour of the campaign.
In addition to viewing the talk, potential visitors can learn more about this campaign by reading Chris’s The Stones River and Tullahoma Campaigns: This Army Does Not Retreat (History Press, 2011) and finding a back issue of Blue & Gray Magazine’s Volume 27, Number 1. Additionally, Dave Powell and Eric Wittenberg are co-authoring a study of the campaign that is set to release through Savas Beatie next summer.
Jim Ogden, the historian at Chickamauga Battlefield, has solved the Tullahoma map conundrum in a fascinating way. Jim created a campaign map on an 8×10′ painter’s drop cloth. He lays it out on the floor & uses cards to indicate the troop movements. It is a brilliant presentation. It was the first time I was able to wrap my brain around the Murfreesboro to Chattanooga Campaign. If memory serves, he originally created it for a presentation to a staff ride of NATO officers.
Equally fascinating is the story of Colonel William Merrill, Rosecrans’ Chief Topographical Engineer for the campaign…how he organized his engineers & continuously updated the critical maps during the operation for subordinate commanders.
Merrill was the unknown genius behind every Union victory from Murfreesboro to The Sea. They used a proto blueprint process to quickly produce maps with up to the minute information. The start date for the Atlanta Campaign was put off because Merrill needed more time to compile the latest scouting information & correct the map that was issued to all Army & Corps commanders. Sherman said he would not have attempted the Atlanta Campaign without Merrill’s maps.
The map errs in one respect – the CS cavalry screen east of Bradyville was gone when Morgan went to Indiana and Ohio. A handful of men, probably from the left behind 1st/3rd Kentucky Cavalry were left behind at Bradyville with the bulk being in front of Hoover’s and Liberty Gaps. This is why Rosecrans went the way he did – he had defeated Morgan three times (Milton, Snow Hill and McMinnville) and Morgan had left the building.
You have that right, Gregg. Wheeler was so out of it that he had concentrated his cavalry at Shelbyville in preparation for a raid against Rosecrans’ communications. I have a report from Forrest indicating the poor shape his command was in after chasing off after Straight. His units were at low strength when Rosecrans advanced. When Wheeler went running off after Grainger’s faint, Rosecrans had succeeded in removing Bragg’s cavalry from the fight without firing a shot. His left maneuvered at will without interference by Wheeler’s cavalry. It was Wilder’s mounted infantry armed with Spencer repeaters & with Eli Lillie’s Battery attached blitzing through Hoover’s Gap that demonstrated the future of cavalry. As Ed Bearss says, from that point on, Confederate cavalry in the West was a net negative.